Gravity does
the ironing.
A suit jacket that fights back against its own creases — using nothing but wool and gravity. The Cartesian Fit jacket is engineered — not treated — to resist its own wrinkles. No heat. No steam. No plugging anything in. Just an engineered bias matrix and the same force that's been pulling things straight since 1687.
MATERIAL KINEMATICS — THE MATHEMATICS OF MOTION, REDEFINED
The Cartesian Fit provides an asset-light intellectual property engine that replaces synthetic elastanes in luxury wool with a patent-pending Dual Symmetrical X-Matrix structural geometry. The framework converts body kinetics and gravitational force into a self-tensioning, crease-clearing system while maintaining a natural-fiber product baseline in its default configuration.
A patent-pending tailoring construction that calculates a fabric-specific bias cutting angle from the wool's own weight, using gravity as a continuous, self-clearing tensioning force.
Every calculation has been independently verified against published research — the engineering is derived from first principles and cross-checked against peer-reviewed textile mechanics literature.
A licensing partnership with a fashion house or manufacturer — as a construction method, a CAD/CAM integration, or a distributable pattern product.
The bias cut itself is a century-old technique — what's absent from the prior art is its use in structured tailoring. Bias-cut construction has long been standard for soft, draped garments (dresses, skirts, scarves), precisely because bias fabric stretches and sags under its own weight — a property that has made it unsuitable, and unused, in structured jackets that must hold a precise shoulder and lapel shape. Existing wrinkle-resistance solutions instead rely on synthetic elastomeric yarns blended into the wool, or resin-bonded canvas interfacings fused with heat — both chemical or synthetic interventions, not a change to the cutting geometry itself. The differentiating claim here is narrow and specific: a formula that calculates a garment-specific bias angle directly from the fabric's own measured weight, turning the same sagging tendency that has excluded bias cutting from tailoring into the tensioning mechanism itself.
Every suit jacket on earth is fighting its own fabric.
Straight-grain construction locks the yarns into a rigid grid with almost no elastic give. Sit, reach, or drive, and those stiff threads have nowhere to go but to buckle — trapping deep, permanent creases across the back and inflating fabric pockets over the scapula. The usual fixes make it worse: synthetic elastomeric yarns fatigue fast and lose their shape memory under dry-cleaning chemistry, while resin-bonded canvas peels and ripples under heat and moisture, and both come at the cost of pure wool's natural weight, breathability, and hand.
Cutting a structured, tailored jacket on the bias has always been considered a non-starter in the industry for exactly this reason — bias fabric stretches and sags under its own weight, which is precisely why bias cutting has stayed confined to soft, draped garments like dresses and scarves, never structured tailoring. The Cartesian Fit turns that same weight into the mechanism itself: a calculated cutting angle converts gravity into a continuous, self-clearing tension, dramatically reducing creasing without a single synthetic fiber, resin, or degree of added heat.
Bias-cut fabric doesn't stretch. It scissors.
Woven fabric is built like a grid — two sets of threads, the warp and the weft, crossing at a fixed 90°. Almost every garment is cut with those threads running straight up-and-down and side-to-side ("straight grain"), because that keeps the fabric rigid and holds shape. Cutting "on the bias" means cutting diagonally across that same grid instead — the crossing points are now free to pivot, like the hinges of a trellis gate, rather than staying locked. The threads themselves barely stretch, but the whole lattice can open and close, converting a pull in one direction into a shear across the weave instead of a permanent crease.
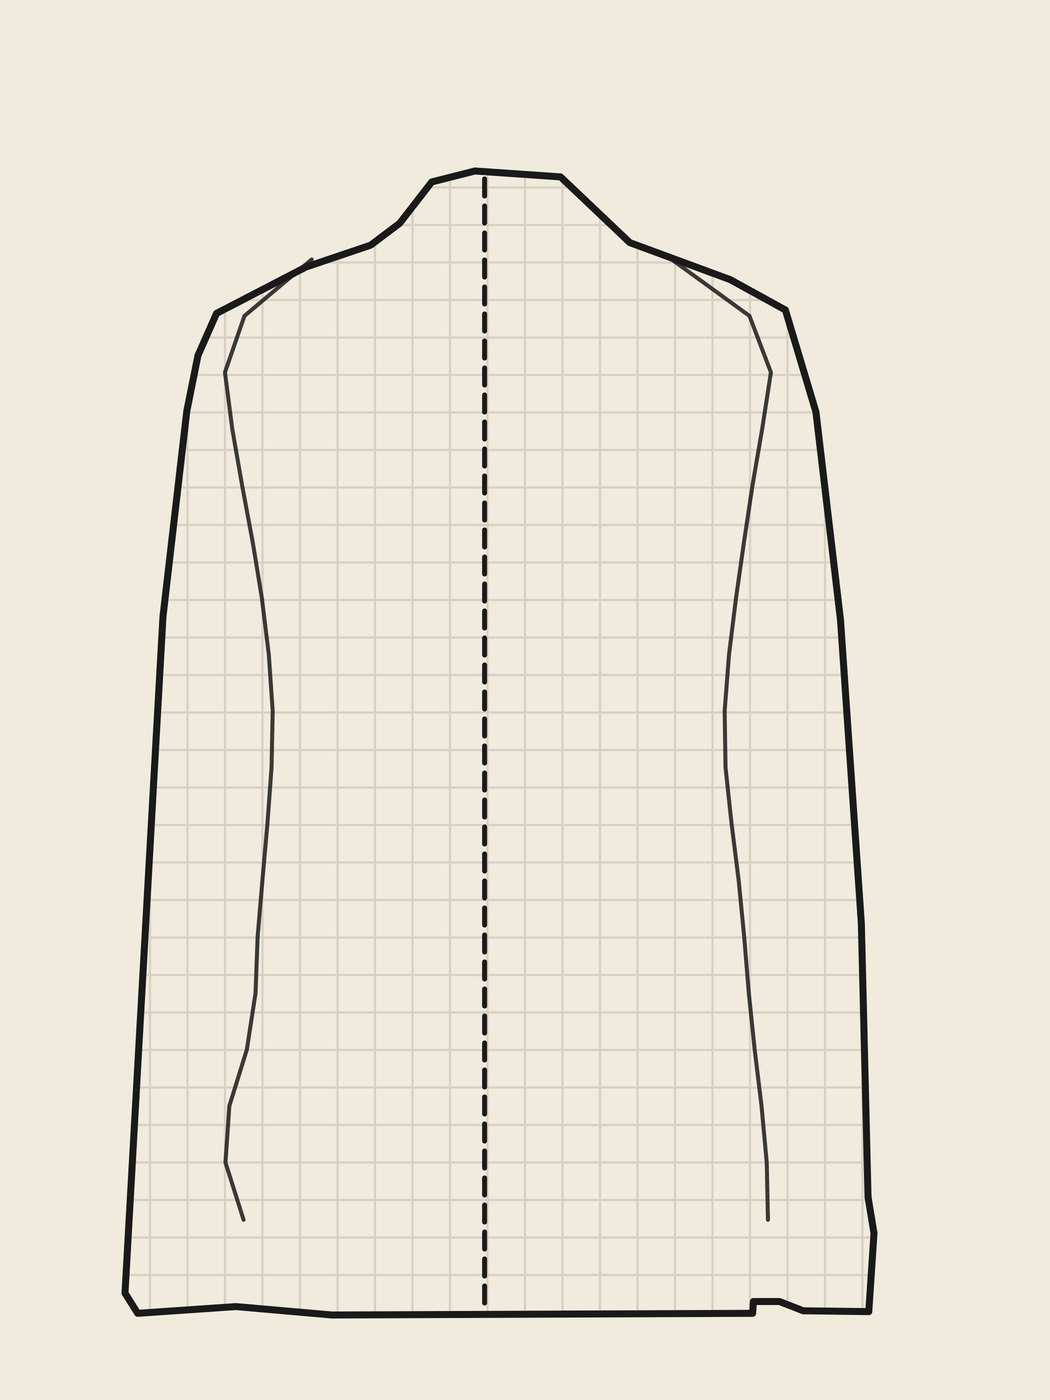
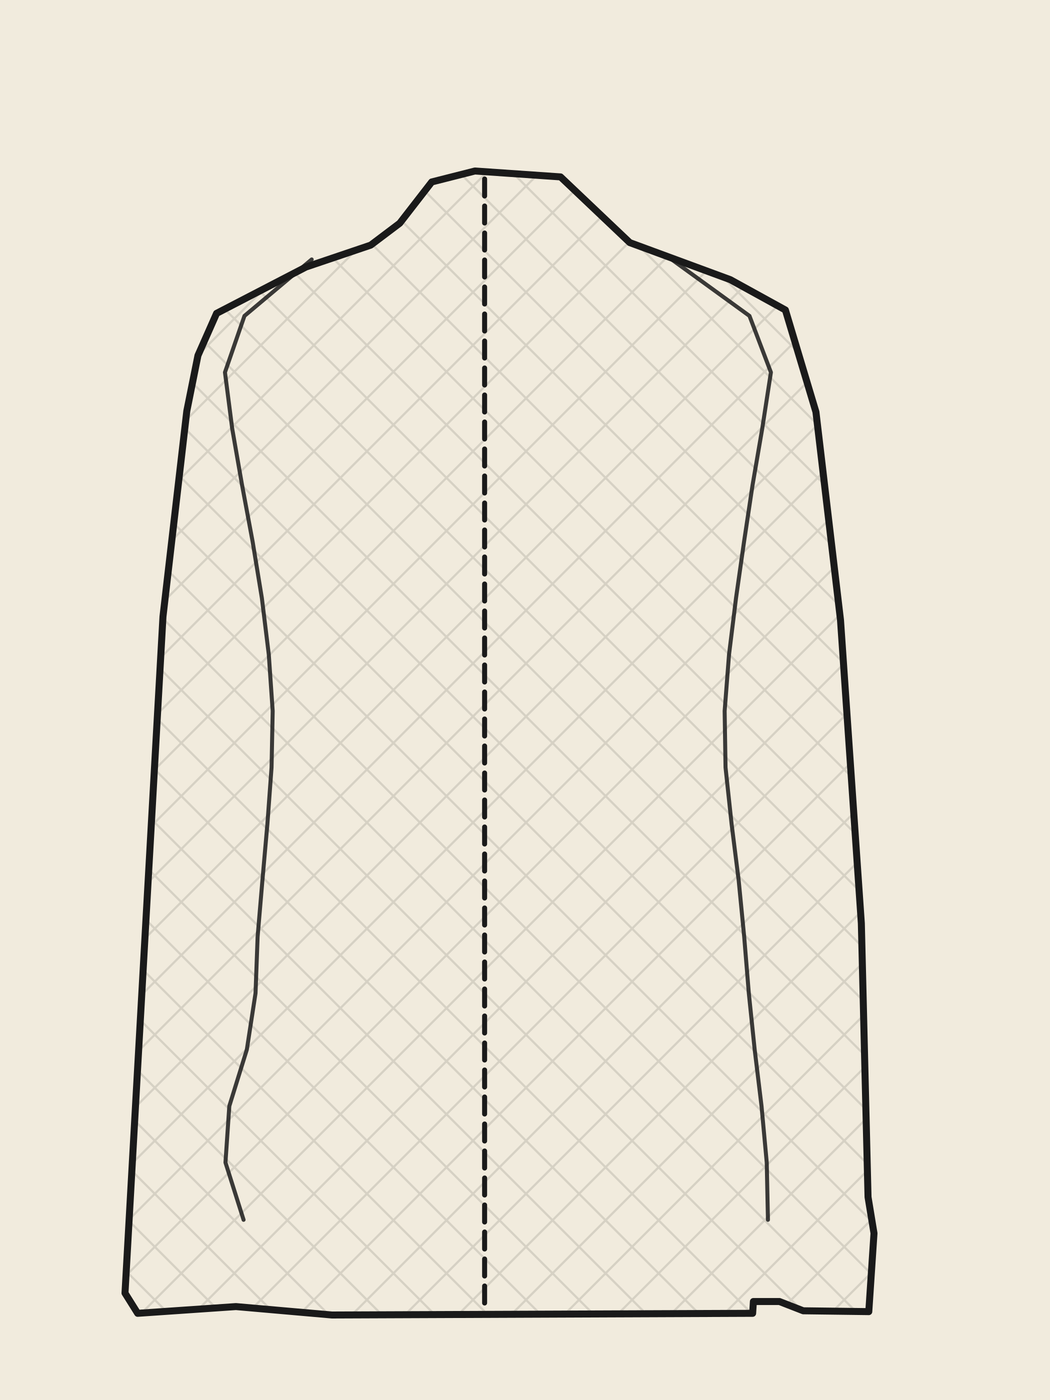
This isn't a new technique — the bias cut was popularized a century ago by the French couturier Madeleine Vionnet, whose 1920s and 1930s evening gowns are still studied for how they moved with the body. It has stayed confined to soft, draped garments ever since, for a real reason: a dress is supposed to move and drape, but a structured jacket has to hold a precise shoulder and lapel shape for years. That same stretch that makes a dress beautiful causes bias-cut fabric to sag under its own weight over time — which is exactly why no one has cut a structured, tailored jacket this way before.
Woven fabric — including ordinary straight-grain wool — is anisotropic: its stiffness depends heavily on the angle relative to the weave, not uniform in every direction. Standard straight-grain cutting places the panel at its stiffest orientation (E_grain ≈ 10.2M N/m²), so kinetic stress has nowhere to go but into buckling. The Cartesian Fit's calculated cutting angle deliberately targets the same fabric's own low-modulus direction — as low as E_bias ≈ 84,000 N/m² at 45°, roughly 122× more compliant — allowing the panel to shear and recover instead of creasing, using the fabric's default natural-fiber construction.
This is exactly the "inextensible yarns, free rotation at crossings" behavior modeled in Section V-C's pin-jointed net kinematics (the mathematics of how connected parts move), and why the calculated cutting angle matters so much: efficiency of this scissoring peaks near 45°, where the bias-direction stiffness is at its lowest — which is also why the weight-dependent formula pulls the angle away from 45° for heavier cloth, trading some scissoring efficiency for a lower elongation risk. The video below is an illustrative visualization of that lattice opening and closing under load, not a physical simulation of a specific fabric.
The self-clearing part comes from what happens when the load is removed. Because the cutting angle is calculated from the fabric's own weight, the garment's suspended mass keeps pulling the lattice back toward its resting angle the moment the wearer stops moving — the same mechanism that opened under a sitting or reaching motion closes again under gravity alone, before the deformation has time to set as a visible crease. This is the same sagging force that has always been the bias cut's weakness in soft garments — here, calculated precisely and put to work instead.
This is why, for a century, tailored jackets have been built the opposite way — cut straight, to stay rigid and hold shape. The tradeoff is that straight-grain fabric has almost no give at all. Sit down, reach forward, drive a car — the stiff threads have nowhere to flex, so they buckle instead, and that buckle becomes a crease that doesn't come out.
The bias cut's weakness — sagging under its own weight — is caused by gravity pulling on fabric that has nowhere controlled to go. The Cartesian Fit doesn't fight that pull. It calculates it, using the fabric's exact weight to set a specific cutting angle tuned to that cloth, rather than a generic 45 degrees.
Sit, reach, or drive, and the panel flexes along its calculated angle instead of buckling — the same trellis-like give a bias cut always has.
The garment's own weight, pulled by gravity along that same calculated angle, works continuously to settle the fabric back flat — no heat, no steam, no synthetic memory fiber.
Front, shoulder, arm, and back — one continuous system.
Every zone works together. Watch the engineering move from the front lapel back through the shoulder, down the arm, and into the rear assembly that ties it all together.
Comfort you feel before you notice it's there.
Luxury has always meant more — more care, more material, more attention paid to how something feels, not just how it looks. But most tailoring treats comfort and structure as opposites: the sharper the silhouette, the stiffer the break-in. The Cartesian Fit doesn't make that trade.
Every panel is cut so the fabric itself flexes where your body does — through the shoulder, across the back, at the elbow — and settles back into shape rather than fighting to hold one. There's no stiff shell to wear in, no pulling across the back when you reach forward, no shoulder seam that announces itself with every gesture. The structure that gives the jacket its line is the same structure that lets it disappear on the body.
That's the part most tailoring can't offer. Not softness in place of shape — precision, worn easily.
What the pattern actually does.
One mechanism, five zones: fabric cut on engineered bias angles, so the wearer's own hanging body weight — not heat, not elastomer — does the tensioning.
Front Lapel Gravitational Tensioning
A true-bias canvas glides free beneath the straight-grain outer shell, joined only by loose pad-stitches — rolling the lapel flat with zero adhesive.
Kinetic Shoulder & Scye Interface
A mirrored herringbone cap yields like a micro-mesh trellis under arm rotation, then a rounded stress relief arc disperses the strain.
Ergonomic Non-Deforming Sleeve
Vertical-grain sections above and below the elbow sandwich a rotated bias mid-joint panel, isolating flex stress so the sleeve never bags.
Parallel Tracking Elasticity Lining
An unpressed accordion fold forms an ease chamber at the spine, so arm-crossing loads absorb into the lining instead of blowing out the back seam.
The Self-Clearing Rear Assembly
Left and right rear panels cut on mirrored bias angles meet at a central chevron. The panels' own hanging weight drives the trellis-gate scissor that keeps every crease from setting in. The whole invention, in one figure.
Every zone, in one rotatable model — with the bias angle tied to the same formula as everywhere else on this page.
The full garment, modeled zone by zone — front canvas, rear assembly, sleeve cap, elbow panel, lining — with an adjustable fabric-weight slider that recalculates the main body's bias cutting angle live, using the same formula (Section III) used throughout this disclosure. Rotate, zoom, toggle views, and export as OBJ or GLB directly in the viewer.
Opens in a new tab. Requires a browser with WebGL support (all current desktop and mobile browsers qualify).
A natural-fiber-first construction, at a moment when synthetic blends are becoming a real liability.
The Cartesian Fit's default construction reduces reliance on the synthetic elastomeric yarns that complicate today's textile recycling streams — mixed-fiber blends are markedly harder to mechanically or chemically separate than mono-material wool, a real and growing constraint as EU textile regulation tightens. A draft EU Ecodesign proposal would classify garments with elastane content above roughly 15% (20% in certain blends) as non-recyclable outright — a concrete regulatory signal already pointing away from synthetic-stretch construction, independent of the fiber's own durability limits. This isn't a claim of full recyclability or a synthetic-free product in every embodiment — the disclosure's own alternative lining and thread specifications include synthetic components — but the core mechanism itself replaces what elastane does in competing "travel wool" lines with pure geometry, not chemistry.
Built on verified physics.
Every mechanism on this page is derived, internally consistent, and independently verified — the angle formula, the force decomposition, the tensor transformation, the elongation-ceiling estimate, and the wear-cycle creep model all trace to an explicit derivation or a cross-checked published source, not a bare assertion.
The bias shear modulus (E ≈ 84,000 N/m²) driving the strain proof is a target value derived from directly-measured, published SiroFAST shear-rigidity data for 100 percent wool suiting fabric (Bilen & Yasar, 2024). This value informs the secondary elongation-risk model specifically — it does not affect the core weight-to-angle cutting formula, which depends only on measured fabric weight. The in-plane shear modulus and Poisson's ratio that this same figure implicitly captures have been shown to require no separate measurement, since the model only ever depends on their fixed combination. The elongation-ceiling figure behind long-term fit retention is now cross-checked against independent published fiber lock-up data, though that data comes from engineered composite reinforcement fabrics rather than wool specifically. The wear-cycle creep model now follows from an explicit first-order saturation derivation rather than an unsupported curve choice.
The mechanism draws on convergent, independently-published research beyond the disclosure's own core citations. The energy pathway — gravitational potential energy converting into a fabric's crease-recovery restoration force — is directly demonstrated in peer-reviewed work (Zhang et al., "Investigation of energy change of the slow elastic deformation for fabric crease estimation," Measurement, Vol. 241, 2025), which found that energy changes during crease recovery are "mainly derived from changes in gravitational potential energy." Separately, the principle that gravitational forces are mechanically significant on textile pieces of any commercial size is established in classical fabric mechanics work (Amirbayat & Hearle, International Journal of Mechanical Sciences, 1986; Journal of the Textile Institute, 1989). Together with the Bilen/Yasar sourcing above, these independently-derived sources support the same physical mechanism from three separate directions — energy dynamics, gravitational mechanics, and bias-direction fabric compliance. This is real, multi-source corroboration of the underlying physics.
A further, independent check: published research on wool fabrics specifically confirms a positive correlation between fabric weight and both bending rigidity and drape coefficient — as weight increases, stiffness increases too. This directly supports the formula's own directional design. Heavier fabric is assigned a lower cutting angle, which trades a smaller gravitational pulling component for a larger lattice-closing (scissoring) component — a trade that is only mechanically safe if the fabric is stiff enough to resist warping under that stronger closing action. The independently-measured weight-to-stiffness relationship confirms exactly that: heavier fabric's higher rigidity is what allows it to safely tolerate the more aggressive closing action the formula assigns it, while lighter fabric's lower rigidity is why it instead receives the gentler, higher-angle, pulling-dominant treatment. The formula's direction is not just internally consistent — it is independently corroborated by measured fabric mechanics.
Not a claim. A trigonometric proof.
The chevron angle isn't fixed — it's tuned per fabric weight, and the force it generates resolves cleanly into two vectors off the wearer's own hanging mass.
Runs parallel to the spine axis. Dominates at high angles — keeps light fabrics from sagging out of shape.
Runs perpendicular to the spine. Drives the trellis scissor that actually erases the crease.
Pulling and closing forces are exactly equal — full trellis efficiency for a standard 315 GSM suiting weight.
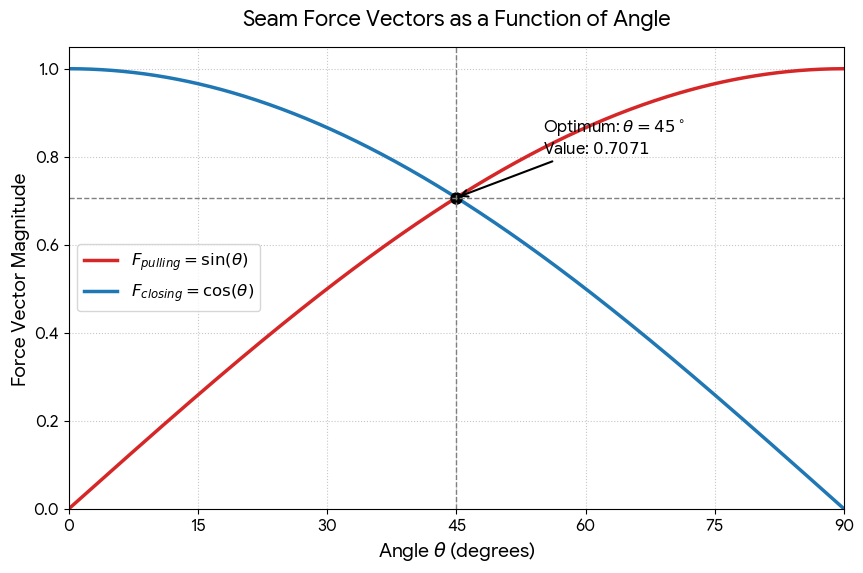
The two vectors above, plotted across the full angle range — crossing at exactly the 45° optimum stated in Claim 7.
| Fabric class | Weight (GSM) | Chevron angle (α) | Sleeve cap radius |
|---|---|---|---|
| A — Ultra-lightweight | 210–229 | +61.4° to +65.0° | 1.0 cm |
| B — Mid-lightweight | 230–289 | +50.0° to +61.2° | 1.2–1.4 cm |
| C — Intermediate | 290–349 | +38.5° to +49.8° (ideal 45°) | 1.5 cm |
| D — Heavyweight | 350–420 | +25.0° to +38.3° | 1.6–2.0 cm |
The same formula shows that the 45° angle which maximizes trellis efficiency also corresponds to the fabric's minimum bias-direction stiffness — meaning Class C, cut nearest true bias, carries a correspondingly higher long-term elongation risk than Class A or D, as modeled by the elongation-risk relationship above. An alternative angle formula reducing that risk across the range, at some cost to trellis efficiency, is disclosed as a configurable alternative embodiment.
Real wool-family cloths, mapped to class
| Cloth | Typical GSM | Optimal angle (α) | Class |
|---|---|---|---|
| Tropical / high-twist worsted | 210–265 | 54.5° to 65.0° | A / B |
| Open-weave hopsack | 210–250 | 57.4° to 65.0° | A / B |
| Four-season worsted, gabardine | 250–320 | 44.0° to 57.4° | B / C |
| Wool twill | 280–320 | 44.0° to 51.7° | B / C |
| Flannel (lighter) | 280–340 | 40.2° to 51.7° | B / C |
| Flannel (winter) | 340–400 | 28.8° to 40.2° | C / D |
Illustrative, non-limiting — actual weight varies by mill, finish, and specific construction. The disclosed and claimed range covers 210–420 GSM (25°–65°). Heavier cloths typically extend beyond this range: Loden (~350–550 GSM) and tweed (~400–600 GSM) overlap the upper boundary, with only their heavier weights falling outside current claims; Melton (~500–700 GSM) falls outside the range entirely.
Vertical structural draft, worked example. A 280 GSM Super 100s-or-finer worsted rear panel (0.75m × 0.40m) under its own 0.824N resting weight elongates by on the order of a few percent along the bias (approximately 3.07% for this configuration) — enough to draw out the weave crimp and erase creases, before the fiber's natural elastic ceiling locks the silhouette back into shape. The exact figure depends on the measured bias shear compliance of the specific fabric selected.
Engineering reference — calculate your own cut
For any fabric outside the four standard classes, the exact chevron angle, gravitational load, and expected draft can be derived directly from the fabric's own weight and panel dimensions.
The four steps below build on each other in sequence: the fabric weight you measure in Step 1 is reused directly in Step 2; the force calculated in Step 2 becomes the input to Step 3's strain calculation; and that strain, combined with the elbow rotation angle, drives Step 4's shear transform. Steps 1 and 2 both start from the same measured weight, so they can be computed in either order — Steps 3 and 4 cannot proceed until the step before them is complete.
W — fabric weight, GSM (g/m²)
Valid for W between 210 and 420 GSM
L, H — panel length & width, m
W — fabric weight, GSM
A — cross-section, width × thickness (m²)
E — bias elastic modulus (research-grounded target value ≈ 84,000 N/m², derived from published SiroFAST shear-rigidity data on 100% wool suiting fabric, Bilen & Yasar 2024)
γxy — horizontal elbow-flexion strain
γx'y' — resulting bias-scissor shear, converts flex into rotation instead of stretch; sign mirrors between the left and right sleeve
Investor Q&A on the physics and the claims.
Eight questions a technical reviewer actually asked, answered directly — cross-checked against the filed specification and the current claim set, not an earlier draft of either.
How is the Dual Symmetrical X-Matrix distinguishable from a century of public-domain bias drape?
Conventional bias applications (evening wear, dresses, scarves) use a fixed, non-varying bias layout for a purely aesthetic purpose: letting the garment cling to and flow over the body. No structural shape-retention is sought. This system instead uses a calculated, material-weight-dependent bias geometry across five coordinated zones specifically to achieve shape retention rather than drape — converting gravity into a restorative force rather than letting the fabric hang loose.
Why must the angle vary between 25° and 65° instead of using a single hardcoded 45°?
45° maximizes trellis scissoring flexibility, but only works cleanly at the intermediate weight it was tuned for (around 315 GSM). Below about 230 GSM, the fabric's own mass is too light to pull the weave straight, and the panel sags out of shape. Above about 350 GSM, the same 45° angle lets the heavy resting mass over-scissor the lattice, causing warping and bagging. The angle formula shifts the cutting angle toward 65° for light cloth and 25° for heavy cloth specifically to keep the two restorative force components in balance across the full working range.
How does the pattern allowance avoid distorting size proportions on a bias-cut panel?
Standard CAD grading shrinks a pattern by a flat percentage on both axes — fine for straight-grain pieces, but wrong for bias-cut ones, since bias fabric stretches along the tension line and contracts across it at the same time (anisotropic, not uniform). The correction here is directional: shrink the pattern length by 1.2% exactly along the calculated pulling-vector axis, then independently widen it along the perpendicular axis by a ratio derived from the pin-jointed net trellis relationship — so the panel settles into the correct target dimensions after repeated wear instead of drifting out of proportion.
How does an abstract shear-strain output become a physical cutting toolpath?
At the baseline configuration (elbow rotation θ = 55°), the shear-strain equation resolves to specific numeric coefficients (−0.9397 for the left sleeve, mirrored to +0.9397 for the right). That value is evaluated against the physical elbow bend-zone length (0.15m) to get an actual linear displacement distance — which becomes a parametric grading offset, pushing the elbow panel's cutting boundary outward by that exact amount before the fabric is cut.
How is cutting precision guaranteed when woven textiles shrink during factory handling?
By fixing the measurement point, not by guessing at shrinkage. The fabric roll runs through a 15-minute, 45Hz steam-preconditioning cycle before any marker is generated — deliberately consuming most of the fabric's long-term relaxation shrinkage under controlled conditions. The weight (W_fabric) that feeds the angle formula is measured immediately after this cycle, not before, so the calculated angle is always based on the fabric's true relaxed state rather than its as-received, not-yet-shrunk state.
Why does spun silk thread need an unusually large needle?
Spun thread (twisted staple fibers, as opposed to smooth filament) has more physical bulk than its nominal thread weight alone would suggest, because that weight measures mass per length, not actual diameter. A needle sized for filament thread of the same nominal weight can shred a spun thread's fibers at speed. The larger needle (Size 90/14 or 100/16, rather than the smaller size a generic thread-weight chart would suggest for this thread weight) gives the bulkier spun fiber the clearance it needs to glide without shredding — a reasonable engineering judgment for this specific thread construction, not a generic industry-standard pairing.
What stops a competitor from hand-cutting around the assembly claims?
The claim set includes standalone component claims (Claims 12–17) that protect the individually cut rear panels, elbow panel, sleeve cap, canvas layer, and lining as complete articles of manufacture in their own right, by virtue of the cutting geometry alone — independent of who assembles them or how. That said, the actual reach of any claim in practice is ultimately determined by an examiner and, if disputed, a court — not by this description of it.
What stops a competitor from rewriting the grading software in a different language?
The claim that resolves the elbow shear-strain transform (Claim 6) is drawn to the specific numeric coefficients the equation produces at the disclosed configuration, tied to the physical structure they generate — not to a particular programming language or notation. A note on precision here: an earlier internal draft of this claim also asserted coverage "regardless of the specific algebraic form" it was expressed in; that broader language was removed during prosecution review as unclear claim scope, and does not appear in the version actually on file. What's protected is the disclosed relationship as claimed, not every possible reformulation of it.
The complete manufacturing method.
Every step from raw fabric to finished hem, in order — steps 1–7 and the elbow-joining/hem portion of step 10 are recited directly in the method claim; the sleeve-cap joining detail in step 8 and the lining-securing step 9 are drawn from the specification's manufacturing protocol rather than the claim itself. Ready to hand to a luxury atelier's pattern team as-is.
Relax the fabric before measuring
Subject the uncut fabric roll or panel blank — before any panel is cut from it — to a 15-minute stabilization cycle: 45Hz micro-vibrational pneumatic frequency combined with 100°C internal steam down-draft airflow, driving the bias lattice to its elongation ceiling prior to cutting. If the lining is also wool-family, it goes through this same cycle before it's cut too; a polyester lining uses a separate, optional heat-setting step instead.
Measure fabric density
Immediately following the relaxation cycle, establish the wool-family balanced-weave textile's material density (W), in GSM, within the 210–420 GSM working range, using the now-relaxed fabric's post-stabilization weight — since relaxation shrinkage increases mass-per-unit-area, this is the true value the cutting angle is calculated from.
Compute the cutting angle
Run W through the linear gradient tracking module: Angle = 65 − (40 × ((W − 210) / 210)). This is the chevron angle for this specific, now-relaxed fabric.
CNC-cut the rear panels
Cut the left panel at the calculated positive angle and the right panel at the mirrored negative angle from the already-relaxed fabric, using a calibrated cutting template — automated CNC in production, though the method covers template-guided or skilled manual cutting equally. At exactly 45°, this may instead be a single continuous panel with a continuously-varying cutting angle in lieu of two discrete pieces.
Stabilize the cut edges
Apply unbonded water-soluble stabilizer tape along every cut edge — Zone 1, 2, 3, and rear chevron panels alike — immediately after cutting, to lock geometry before assembly.
Join the rear chevron
Join the left and right panel segments along the central vertical axis, at a feed tension under 25 cN, to establish the Primary Structural Chevron Node.
Cut and float the chest canvas
Cut the left internal chest canvas interlining on a +45° diagonal bias and the right on a mirrored -45° diagonal bias, then slideably interlock each to its corresponding straight-grain front shell using loose floating pad-stitch chevron vectors under 25 cN — no fusing, no adhesive.
Cut the sleeve cap and elbow panel
Cut the sleeve cap as a mirrored herringbone split (+45°/−45°, corners rounded 1.0–2.0cm), and the mid-joint elbow panel at a +45°–65° trajectory on the left sleeve, mirrored to -45°–65° on the right sleeve, relative to the horizontal baseline datum. Join the sleeve cap to its adjacent panels using variable-pitch sewing at a 1.05:1 micro-relaxed ease ratio, to accommodate lateral wool contraction at this curved seam.
Secure the lining
Secure the Parallel Elasticity Lining Shell Profile Layer to the outer shell at discrete anchor points only, using a hand-worked thread-chain swing tack rather than a continuous seam — the lining stays free to shift and re-settle independently of the outer shell's own bias-direction shear deformation. The accordion fold itself is anchored separately, at discrete points every 3–5cm along its vertical run, into the center-back seam's own seam allowance — not to the outer shell directly — so its bulk is contained without restricting its capacity to release length during wear.
Join the sleeve assembly and close the hem
Join the elbow panel to the adjacent straight-grain sleeve sections using automated flat-feed sewing calibrated to maintain continuous tension transmission across the seam — deliberately without the ease fullness used at the sleeve cap seam, since introducing ease fullness here would absorb the elbow expansion strain before it can convert into diagonal lattice scissoring — machines run a floating feed dog with Size 90/14 or Size 100/16 ball-point needles — one size or two larger than the general Tex-to-needle pairing, since spun silk's bulkier, less uniform surface texture needs more clearance than filament thread of the same weight — sliding between yarns rather than slicing the wool fiber. Execute the final edge hem closure.
This sequence covers the novel bias-cutting, relaxation, and assembly steps specific to the gravitational self-clearing mechanism. Conventional tailoring stages this patent doesn't alter — collar construction and attachment, pocket construction, buttonhole working and button attachment, and shape-setting pressing of the lapel, collar, and finished garment — happen at their ordinary points in the build using standard bespoke or industrial tailoring practice.
Thread & tension by zone
| Zone | Thread | Stitch configuration | Density | Tension |
|---|---|---|---|---|
| Zone 1 — Front panel | 100% filament silk (Tex 16) | Floating chevron hand pad-stitch | 1–2 st/cm | < 25 cN |
| Zone 2 — Sleeve cap | Long-staple spun silk (Tex 21) | Flexible over-edge lock-chain | 3–4 st/cm | 20–30 cN |
| Zone 3 — Elbow seam | Spun silk (Tex 30) | Fluid variable-pitch lock-stitch | 3 st/cm | 35–45 cN |
| Zone 4 — Chevron lining | Lubricated filament silk (Tex 24) | Reinforced flat-fell double-lock | 4–5 st/cm | 30–40 cN |
| Zone 5 — Rear chevron seam | 100% filament silk (Tex 16) | Floating chevron hand pad-stitch | 1–2 st/cm | < 25 cN |
The geometric cutting angles are delivered as parametric, CNC-readable grading scripts — coordinate data intended to plug into standard computerized cutting environments, rather than a fixed physical pattern. Compatibility with a specific factory's CAD/CAM system (Lectra, Gerber, or otherwise) is expected, consistent with standard parametric grading data interchange.
"I didn't want to fight the wrinkle. I wanted to let gravity win — and cut the fabric so that winning looks good on you."
A fashion designer since 2006, with a background as a suit specialist in fashion retail — hands-on time with wool, on real bodies, that eventually became the starting point for this mechanism.
Three ways this becomes a business, not just a patent.
The claim structure was built to support more than one revenue path — licensing the software, supplying pre-cut components, or certifying finished garments — without requiring Cosmin Radu to become a garment manufacturer itself.
Parametric CAD/CAM licensing
Brands and manufacturers license the grading engine to plug into their existing industrial CAD systems: mill fabric-weight data goes in, an optimized cutting toolpath comes out, tuned to that specific fabric.
Pre-cut component supply
Because the individual cut components are separately protected, a centralized cutting and stabilization hub could supply pre-stabilized, pre-cut panel kits directly to ateliers for local assembly — without those ateliers needing the CAD system themselves.
Structural certification licensing
Design houses could license the right to mark a finished garment as built to this structural standard — an elastomer-free, adhesive-free shape-retention claim a luxury buyer can be shown, not just told.
We've engineered the physics. Now we're bringing it to the houses that will build it — luxury ateliers and mass production alike.
The Cartesian Fit exists today as a fully-specified, patent-pending pattern system, engineered to the standard luxury fashion houses expect, and structured — through CAD/CAM licensing — to scale directly into mass production. We're raising a seed round to license the pattern system to a partner house, whether that's a made-to-measure atelier or a large-scale manufacturing line.
This wasn't designed from the outside looking in. Cosmin Radu worked as a suit specialist at Hugo Boss before developing The Cartesian Fit — the invention comes from firsthand familiarity with how tailored garments are sold, worn, and fail, not just how they're engineered on paper.
Protected in Sweden under active priority application status (PRV nr 2600132-1), with an established international priority filing window. Corporate technology out-licensing structures are open for integration across distinct fields of use, including Contemporary Luxury Menswear and High-Performance Executive Travel Categories.
No product exists yet to purchase, and no payment or commitment is requested here — this list exists purely to gauge genuine interest ahead of production, at an estimated eventual price point of $5,000 per suit. Joining does not reserve a unit or obligate you to anything; it simply lets us reach out first once a finished prototype and production timeline exist.
Join the Private Interest ListIndependent third-party market research, not a proprietary survey, since no structured customer discovery has been completed yet — shows wrinkle resistance is already one of the fastest-growing purchase drivers in premium tailoring:
The need is proven and growing — independent of whether this specific technology succeeds. The open question isn't whether demand exists, it's whether the market's dominant current answer to it is actually adequate. Today, roughly 41% of manufacturers meet that demand by blending synthetic elastomeric fiber into the wool weave — a real, effective, widely-adopted fix that also carries the documented drawbacks addressed elsewhere on this page: material fatigue, loss of recovery after repeated dry cleaning, and a draft EU Ecodesign proposal that would classify elastane content above 15–20% as non-recyclable outright.
The Cartesian Fit is built to meet that same proven, growing demand mechanically rather than chemically — intercepting it at the exact moment the market's dominant current solution is running into regulatory and durability pressure. This is a reasoned market thesis built on independent industry data, not a claim that primary customer validation has already been completed; that validation is a planned next step, not a finished one.
The full patent claim text, grading scripts, and toolpath coordinate data are held under the standard PRV secrecy period and shared under mutual NDA only. Request access from a corporate email address.
Request Secure Technical Disclosures & EoU BriefsFor a lighter first step — a non-confidential overview and the CNC integration protocol, no NDA required.
Request Non-Confidential Data Sheet & CNC Script Integration Protocol (PDF)